How to send a Custom Offer to clients?
You must have at least one gig posted before you can send a custom offer to your clients.
📌 Option 1: Sending a Custom Offer Without a Client Request
If the client has not explicitly requested a custom offer but you wish to send one, follow these steps:1. Go to Your Messages Page
- Navigate to the Messages section of your ARRIVE account.
- Select the client's name from the left message board.
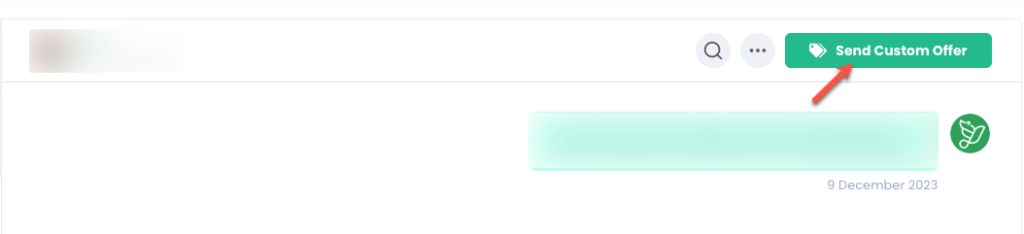
2. Click "Send Custom Offer"
In the top-right corner of the message window, click the green "Send Custom Offer" button.3. Enter Offer Details
In the pop-up window, provide:
- A detailed description of the service you are offering.
- The total price for the offer.
- The number of hours the service will last.
- If the service lasts more than 24 hours, specify this in the description.
4. Submit the Offer
Once you send the offer, the client will receive a notification. They can either accept and pay for it or decline it.
📌 Option 2: Sending a Custom Offer When a Client Requests One
If a client requests a custom offer from you, follow these steps to respond:
1. Check Your Notifications
When a client requests an offer, you will receive a notification on your ARRIVE account. Click on the bell 🔔 icon in the top-right corner to view the request.
2. Open the Request & Create the Offer
Click on the request notification. This will open the email/message page, where you will see a "Create Custom Offer" button.

3. Enter Offer Details
In the pop-up window, provide:
- A detailed description of the service you are offering.
- The total price for the offer.
- The number of hours the service will last.
- If the service lasts more than 24 hours, specify this in the description.
4. Submit the Offer
Once you send the offer, the client will receive a notification. They can either accept and pay for it or decline it.
How to Structure Your Custom Offer for Clarity and Success
When sending a custom offer, it's crucial to provide all the necessary details so the client knows exactly what to expect. Clearly outline the following:
Performance Type
Specify whether it's a solo act, band performance, DJ set, comedy show, dance performance, or another entertainment service.
Date & Time
Mention the exact date and time of your performance to ensure there are no scheduling conflicts.
Duration
Indicate how long the service will last (e.g., 2 hours, 3 sets of 45 minutes, full-day event). If your offer covers more than 24 hours, state this clearly in your description.
Location
Provide the event venue’s name and address. If it's an online performance, mention the platform you’ll be using (e.g., Zoom, YouTube Live, etc.).
What’s Included in This Offer
Break down everything the client will receive, such as:
- Live performance with a specified number of songs or set duration
- Sound and lighting equipment (if provided)
- Custom song requests (if applicable)
- Background music between sets
- Any additional perks (e.g., meet & greet, social media promotion)
Traveling Expenses
If your service requires travel, mention whether travel costs are included or if there will be additional charges based on distance.
Closing Message
If you have any special requests or need adjustments, feel free to let me know! Looking forward to making your event amazing and delivering a performance your guests will love!
Managing Your Sent Offers
Once you send a custom offer, you can track and manage it through your ARRIVE account. Here’s what you need to know:
Withdrawing an Offer
You can withdraw a custom offer at any time before the client accepts and pays for it. If you need to make changes, you can cancel the current offer and send a new one.
What Happens After a Client Accepts?
Once the client accepts and pays for your custom offer:
- You are obligated to deliver the service as per ARRIVE’s Terms of Service, Community Guidelines and the Performer’s Service Agreement.
- The details of the booking will be available in your account for reference.
- Clients may reach out for additional information, so ensure you stay responsive.
Tracking Your Offers
To view and manage all your sent proposals, visit: My Proposals page.
Keeping track of your offers helps you stay organized and ensures smooth communication with your clients.
Pro Tips for Sending a Great Custom Offer
To increase your chances of securing bookings and ensuring a smooth client experience, follow these best practices when creating your custom offer:
Be Clear & Specific
Outline exactly what the client will receive, including performance details, duration, and any additional services. Avoid vague descriptions to prevent misunderstandings.
Mention Any Additional Details
If your offer extends beyond 24 hours or requires special arrangements, include that information upfront. Clients appreciate transparency and detailed expectations.
Set Realistic Expectations
Make sure your offer accurately reflects the services you can deliver. Be honest about your availability, required setup time, and any special requirements.
Stay Responsive
Clients may have questions before accepting an offer. Prompt replies show professionalism and help close more bookings.
Personalize Your Offer
Tailor your offer to the client’s event needs. A personalized approach increases the likelihood of acceptance.
Provide Competitive Pricing
Offer fair pricing based on industry standards, your experience, and the event’s requirements. If applicable, include optional add-ons for more flexibility.
By following these tips, you can enhance your chances of getting booked and create a seamless experience for your clients!